عربي
عربي


You can create various types of forms in Interspire Email Marketer:
- Subscription: lets contacts sign up for your emails.
- Unsubscribe: lets contacts unsubscribe from your list, and stop receiving emails. This has the same effect as the unsubscribe link you can add to your emails.
- Modify details: lets contacts change the information recorded about them in your
- contact list.
- Send to friend: lets contacts forward an email to another person.
Creating or Editing a Subscription Form
Take the following steps to set up or edit a Subscription website form. See the corresponding sections for information on how to complete each step.
- Click Forms in the toolbar, then Create a website form.
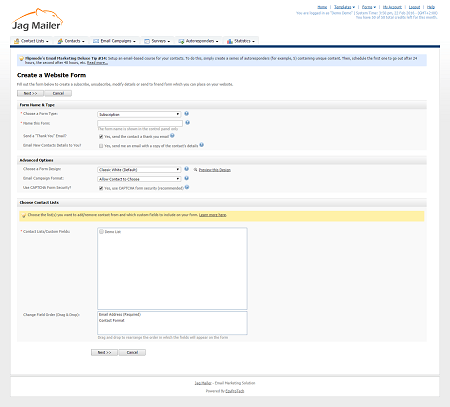
- Select Subscription in the Choose a form type field. Configure the other basic form settings (form name, form design and format, CAPTCHA security, and the contact list ‐ or lists ‐ for the form).
- Design the confirmation page (a page that displays when contacts have filled in their details, requiring that they click another link to be added to the list) and the confirmation email (an email sent to contacts requiring that they click a link to be added to the list).
- Design the thank‐you page (the page that displays once contacts have been successfully added to the list) and the thank‐you email (an email sent to contacts once they have been successfully added to the list).
- Design the error page (a page that displays if an error occurs in the sign‐up process).
- Add the form to your website.
Creating or Editing an Unsubscribe Form
Take the following steps to set up or edit an Unsubscribe website form. See the corresponding sections for information on how to complete each step.
- Click Forms in the toolbar, then Create a website form.
- Select Unsubscribe in the Choose a form type field. Configure the other basic form settings (form name, form design, and the contact list ‐ or lists ‐ for the form).
- Design the confirmation page (a page that displays when contacts have filled in their details, requiring that they click another link to be removed from the list) and the confirmation email (an email sent to contacts requiring that they click a link to be removed from the list).
- Design the thank‐you page (the page that displays once contacts have been successfully removed from the list) and the thank‐you email (an email sent to contacts once they have been successfully removed from the list).
- Design the error page (a page that displays if an error occurs in the unsubscription process).
- Add the form to your website.
Creating or Editing a Modify Details Form
Take the following steps to set up or edit a Modify details form. See the corresponding sections for information on how to complete each step.
- Click Forms in the toolbar, then Create a website form.
- Select Modify Details in the Choose a form type field. Configure the other basic form settings (form name, form design and format, CAPTCHA security, and the contact list ‐ or lists ‐ for the form).
- Design the thank‐you page (the page that displays once contacts have modified their details) and the thank‐you email (an email sent to contacts once they have been successfully modified their details).
- Design the error page (a page that displays if an error occurs in the modification process).
- Include a link to the form in your emails or autoresponders using the corresponding custom field.
When you are editing a template, email or autoresponder, click the Custom fields button. Then, select Modify details forms. Select the name of the form from the list that displays.
Note: You cannot add modify details forms to your website. Use the custom field link to
add them to your emails instead.
Creating or Editing a Send to Friend Form
Take the following steps to set up or edit a Send to friend form. See the corresponding sections for information on how to complete each step.
- Click Forms in the toolbar, then Create a website form.
- Select Send to Friend in the Choose a form type field. Configure the form design.
- Design the thank‐you page (the page that displays once contacts have successfully forwarded the email).
- Design the forwarded email headers (the HTML and text headers that display above the forwarded email, identifying the sender by whom it was forwarded).
- Design the error page (a page that displays if an error occurs in the sending process).
- Include a link to the form in your emails or autoresponders using the corresponding custom field.
When you are editing a template, email or autoresponder, click the Custom fields button. Then, select Send to friend forms. Select the name of the form from the list that displays.
Note: You cannot add send to friend forms to your website. Use the custom field link to add them to your emails instead.