Creating and Editing Contact Lists
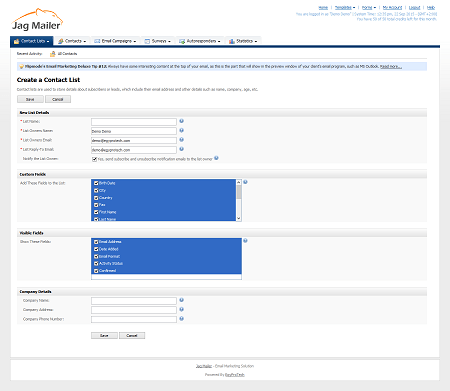
Take the following steps to create or edit a contact list:
- To create a new contact list, click Contact lists in the navigation bar. Select Create acontact list.
To edit an existing contact list, click Contact lists in the navigation bar, select Viewcontact lists. Click the Edit link next to the contact list you want to modify. - Configure the fields in the screen that displays.
Create or Edit a Contact List
New list details
List name
Enterthe name forthis contactlist. This name appears in the control panel
and subscription forms.List owner’s name
- Enter the name of the list owner. This is the name that appears on emails to this contact list.
- Enter the e‐mail address of the list owner. This is the default “from” address that displays on email sent to this contact list.
List reply‐to email
Enter the default reply email address for emails sent to this contact list.
List bounce email
Enter the address to which bounced emails from this contact list are sent.
Notify the list owner
Select the check box to have an email sent to the List owner’s email every
time a contact subscribes to, or unsubscribes from, the list.Custom fields
Add these fields tolist
Select the custom fields you want to associate with this list.
Visible fields
Show these fields Select the fields you want to display in the list’s View contacts page.
Company details
Company name
Enter your company name. This is used when you add the
%%companyname%% variable in your emails to this list.
Note: Configure this field and use the %%companyname%% variable in your
emails to adhere to the CAN‐SPAM act.
Company addressEnter your company address. This is used when you add the
%%companyaddress%% variable in your emails to this list.
Note: Configure this field and use the %%companyaddress%% variable in
your emails to adhere to the CAN‐SPAM act.Company phone number
Enter your company address. This is used when you add the
%%companyphone%% variable in your emails to this list.
Note: Configure this field and use the %%companyphone%% variable in your
emails to adhere to the CAN‐SPAM act.
Bounce account details
Process bounced emails
Select the checkbox to process bounced emails (see Bounced Emails on
page 38).
Note: If you do not process bounced emails your server is in danger of
becoming blacklisted due to repeated attempts to email unavailable
accounts.Bounce email server name
If you selected the Process bounced emails checkbox, enter the IP
address or hostname of the server you want to use to process bounced
emails.Bounce email user name
Enter the username for your account on the email server you use for
processing bounced emails.Bounce email password
Enter the password for your account on the email server you use for
processing bounced emails.IMAP emailaccount
Select the checkbox if the account on the bounce server is an IMAP
(Internet Message Access Protocol) account.
Deselect this if the account is a POP3 (Post Office Protocol version 3)
account.Use extra mail settings
Select this if you need to configure the bounce email server account
further. The following fields display:
Do not validate certificate: select this if you do not want to validate
the server’s SSL (Secure Sockets Layer) certificate.
Use this if your server uses a self‐signed certificate. If you are not sure
whether your server uses a self‐signed certificate, do not select this.
Do not use TLS: select this if you do not want to use TLS (Transport
Layer Security) to connect to the server. If you are not sure whether
you want to use TLS, do not select this.
Do not use SSL: select this if you do not want to use SSL (Secure
Sockets Layer)to connect to the server. If you are not sure whether you
want to use SSL, do not select this.
Others: enter any other options required to connect to the server.Agree to delete emails
Select this if you want to delete emails from the server once you have read
them. If you did not save an email on your computer, you will not be able
to re‐read the email.Test bounce settings
Click this to test the bounce email account by sending a test email.
- Click Save to save your changes. Alternatively, click Cancel to return to the View contact lists screen without saving any changes.

 عربي
عربي


