عربي
عربي


Interspire Email Marketer allows you to create autoresponders using the built‐in editor.
Note: If you want to create a new autoresponder based on an autoresponder you created previously, use the Autoresponders > View autoresponders screen to copy the template, then edit the new template. To edit an autoresponder, click its Edit link in the Autoresponders > View autoresponders screen.
Take the following steps to create an autoresponder:
- Click Autoresponders in the navigation bar and select Create an autoresponder.
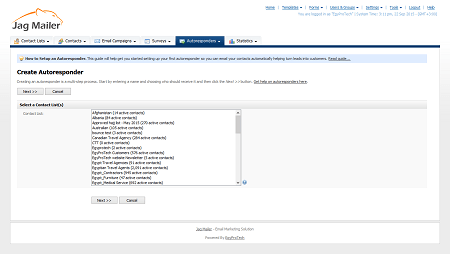
- Select the contact list for this autoresponder and click Next
- Enter a name for the autoresponder in the Name this autoresponder field.
- If you want to send this autoresponder to all contacts who sign up and subsequently confirm thatthey wantto receive emails, select All contacts in my list with a status of “confirmed”.
Alternatively, you can send this autoresponder to certain contacts only. Select Only contacts who match my search criteria (below). The following fields display
Configure the Filter by basic details fields:- If you want to send this autoresponder only to contacts with a certain type of email address (for example, all contacts at hotmail.com), enter all or part of the email address in the Email address field.
- If you want to send this autoresponder only to contacts configured to receive HTML or Text emails only, select the relevant option from the Match format list.
- If you want to send this autoresponder only to contacts who are Confirmed or Unconfirmed only, select the relevant option from the Match confirmed status list. If you want to search for both, leave Both confirmed and unconfirmed selected (default).
- If you want to send this autoresponder only to contacts who have, or have not, clicked a specific link in your autoresponder, select Yes, filter by link.
- If you want to send this autoresponder only to contacts who have clicked a link, select Has clicked in the first list, and select the relevant link in the second list. If you want to send this autoresponder only to contacts who have not yet clicked a link, select Has not clicked, and select the relevant link in the second list.
- If you want to send this autoresponder only to contacts who have, or have not, opened a specific email, select Yes, filter by opened email campaign.
If you want to search for contacts who have opened an email, select Has opened in the first list, and select the email campaign in the second list.
If you want to find contacts who have not yet opened an email, select Has not
opened, and select the email campaign in the second list.
-
If the contact list contains custom fields, you can search each field in the Filter by custom fields section.
- Click Next.
Autoresponder details
Send from thisname
This displays the default “from” name for the contact list you selected. If you want to change this name, enter the new name in this field.
Send from this email address
This displays the default “from” email account for the contact list you selected. If you want to use a different email account, enter the new
address in this field.Send reply emails to
This displays the default reply email address for this contact list. When a contact replies to your autoresponder, this is the address to which the reply is sent. If you want to use a different address, enter the new address in this field.
Send bounced emails to
This displays the default bounced email address forthis contactlist. This is the address to which undeliverable emails are sent. If you want to use a different address for handling bounced emails, enter the new address in this field.
Email format
• Select HTML and Text if you want this autoresponder to be sent with both HTML and plain text elements (multipart). Email clients that can
display HTML messages use the HTML element, and clients that cannot display HTML use the plain text element.
• Select Text if you want this autoresponder to be sent in plain text only.
• Select HTML if you wantthis autoresponderto be sent in HTML only. If you select this option, your emails will not display in email clients that cannot display HTML messages.
My “first name” custom field is
If your autoresponder uses a custom field to define a recipient’s first
name, select it here.
If your autoresponder uses a single field to define a recipient’s name,
select it in this field.
My “last name” custom field is
If your autoresponder uses a custom field to define a recipient’s last name,
select it here.
If your autoresponder uses a single field to define a recipient’s name, leave this field blank.
Send to existing contacts
Select this to send the autoresponder to contacts who already belong to the contact list.
For example, if you set up an autoresponder to send ninety days after a contact was added to the list, contacts who were added to the list fewer
than ninety days ago will receive the autoresponder on the relevant date.
Send this autoresponder
Select As soon as the contact joins my list to send the autoresponder to contacts immediately when they join the list.
Select After the contact has been on my list for to send the autoresponder a specific number of hours, days, weeks, months or years
after the contact has joined the list. Enter the time in the fields that display.
Send your email as multipart?
Select this to send both HTML and text elements of a multipart autoresponder to recipients. This allows a recipient’s email client to
choose the correct display method.
Note: Use this option if you are unsure. Also, use this option if you don’t
provide your recipients with the ability to choose HTML or text
emails.Track open rates for html emails?
Select this to have Interspire Email Marketer track the proportion of
HTML autoresponders opened by their recipients.
Track links clickedin this email?
Select this to have Interspire Email Marketer track the proportion of links in this autoresponder that are clicked by the recipient.
You can view the results of clicked links in the Statistics > Autoresponder statistics.
Embed images as attachments?
Select this to embed the images you send in HTML emails, rather than linking to them. This allows recipients to view the autoresponder offline, but can increase the email size significantly.
Iwant to• Select Create the content of my autoresponder from scratch if you do not want to base this autoresponder on an existing template.
• Select Use a template as the basis of my autoresponder if you want to base this autoresponder on an existing template. - Click Next. The autoresponder editor displays.
Note: If you selected Text only in the previous page, the HTML Content section in this page does not display. Likewise, if you selected HTML only, the Text Content section in this page does not display.
- Specify how you want to build the HTML autoresponder.
• If you want to use the built‐in WYSIWYG (What You See Is What You Get) editor in this page, select Create content using the WYSIWYG editor below.
• If you want to use an HTML file on your computer, select Upload a file from my computer. Click the Browse button that displays. A file upload window displays;
locate and select the file you want to use and click OK. Click Upload. The HTML editor screen updates to show the new file.
• If you want to use a file from a page on the Internet, select Import a file from a web
site and enter the full URL in the field that displays. Click Import. The HTML editor screen
updates to show the new file. -
Customize the HTML email using the editor.
- Customize the text email using the editor
-
Check that your autoresponder will not be marked as spam by a recipient's email client. Click Check your email for spam.
Note: This checks the text in your autoresponder against a list of known spam keywords.
However, it cannot guarantee that your autoresponder will be delivered to all
recipients.If either the HTML or text versions of your email break any rules, take note of the
offending text and edit the autoresponder to not include the term.
Click the exit icon to close the Check your email for spam window. -
heck that your autoresponder displays correctly in a variety of common email clients.
Click View your email in different email programs. The Email Validation screendisplays in a new window. When you have
finished, close the window. - If you want to test the autoresponder by sending it to your own email address:
• Enter the email address from which you want to send the test email in the Send preview from this email field.
• Enter the email address to which you want to send the test email in the Send preview to this email field.
• To send the test email, click Preview your email campaign. Check the inbox of the account you entered in the Send Preview to this Email field. - Finish the autoresponder:
• Click Save & keep editing to save the new autoresponder and remain in this screen to make further changes.
• Click Save and exit to save the new autoresponder and go to the View Custom Templates screen.
• Click Cancel to return to the View Custom Templates screen without saving the template. Any changes you made are lost.